Saturday, July 16, 2011

Do It All Hoop

There has been some discussion lately on one of my sewing lists about using the Do It All Hoop for the Hus/Viking embroidery machines.  I have heard some discontentment using this hoop and I am hoping that maybe some tips might help those having trouble. Maybe it will become one of your favorites too.  I personally use this hoop at every chance because of the latch closure.

The biggest advantage to using this hoop for a larger type project where you need to do many hoopings....once you adjust the hoop to accommodate your project....you can just open the latch and close it without any more adjustments.....very quick and very easy.....no tightening or re-tightening after each hooping.

First thing to notice is your hoop came with two inner hoops....one marked LIGHT and one marked HEAVY.  It is important to use these in the appropriate applications.  If you compare them..... the LIGHT one is slightly larger than the HEAVY one.  Which might seem confusing, but the LIGHT one is used with 1-2 layers like your cotton-type fabric with stabilizer, or just one layer of fabric or 1-2 layers of stabilizer.  The HEAVY one is used for felt, quilts with batting or any other thick fabric so the hoop is slightly smaller to help accommodate the thickness of the fabric.


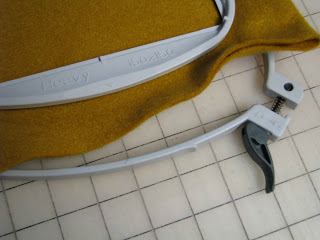
The pic above shows two layers of felt that I am going to hoop with the HEAVY inner hoop.  Notice the position of the dark gray latch.  This is used to close the hoop and make it tight, but before you do that....you need to hoop the felt between the two hoops.


Two layers of felt are thick......I didn't have enough room to even hoop them....so I turned that dark gray latch and loosened it like a screw......"remember lefty loosey and righty tighty."  So turn it to the left.....you can see the screw part backing into the latch as you loosen it.  Now I usually give it several turns and then TRY and close the latch.  As a rule of thumb after you hoop your layers.....your fabric is slightly loose in the hoop before you close the latch.  Closing the latch is what tightens it up so you can embroider on it.  You don't have it tight in your hoop before closing the latch.  Then you will not be able to close the latch or you will break it trying.  :(

Absolutely do not force the latch....if it will not go or is warping the closure....STOP.....and loosen the screw some more.  This is how the closure gets broken.  You need to stop turning the screw so that the lever is at the position in the above picture.  Then push the lever toward the hoop as shown below to close the latch and your fabric/stabilizer should be solid in your hoop and ready for embroider.  If it is too loose open the latch and tightening the screw some and close latch again.  If is is too tight, loosen the screw and try closing the latch again.


This shows the latch closed correctly using the HEAVY inner hoop with felt and the latch is not distorted or stressed.....this is how to keep if from being broken.


This shows the same process except I am using the LIGHT inner hoop instead of the HEAVY.   Another thing I failed to mention above is to match that little center mark on the hoop.....it is just left of the zig-zag stitching....to the arrow on the hoop....which does not show in the photo, but it is there.  You should always do that with either one of the inner hoops.

I need to adjust the screw and tightening it up a bit when I go from the HEAVY inner hoop to the LIGHT.  So give the dark gray lever several turns to the right and then try the latch.....remember DO NOT FORCE IT.  You need to stop turning the screw so that the lever is at the position in the above picture.  Then push the lever toward the hoop as shown below to lock it in place.


You want your fabric/stabilizer solidly held in the hoop without distorting the closure latch.  If your lever does not want to close you have tightened the screw too much and you need to loosen it a bit.  Then you will not break the latch and be able to use this hoop over and over again.

Hopefully this is clearer than mud.  If you have any questions let me know and hopefully I can answer them.  :)  I use this hoop more than I use all of my others combined, if I have a choice.

Note:  In the LIGHT hoop I have hooped scrap pieces of stabilizer that I have pieced together to use in another project.  I wrote about that in the Repurposing post.

Saturday, July 9, 2011

Still in Patriotic Mode

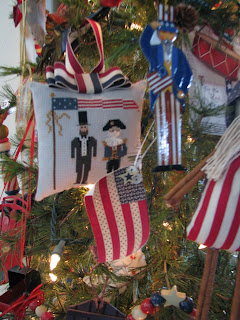
I wanted to do a few pictures of my patriotic tree before I take it down later this month.  A lot of the items have been gifts to me over the years.....some I have collected from travels and little "gifty" stores.  Others I have stitched and those are probably my favorites.  I keep my tree in the doorway between our kitchen eating area and our living room.....so it is like a night light in the evening that lights up the whole main part of the house.  I have it set on a timer so it goes off and on without any effort on my part.  I used to keep a full size tree up, but I bought this one several years ago at one of the local craft shops after Christmas.  It has a wooden tree trunk and is tall and skinny with pine cones glued to some of the branches.  Very quaint and it doesn't take quite as much room, but seems to handle all the weight of the ornaments......there are quite a few...... but I always say more is better.........


Here is Abe & George, that I stitched several years ago.  You can also see in most of the pics several red metal ornaments....those were all given to me by a dear friend.  The shiny tin Uncle Sam is very fun.  The little flag is just put together from printed flag fabric with a fusible webbing to secure it to a backing fabric.  I added some buttons and ribbon to make the hanger with the glue gun.  You could do this with any shape and make a garland type decoration.

This little stocking was done on Herta cloth I think...about 5-6 count and you use 6 strands of embroidery floss at a time.  There is a little patriotic Beanie Baby bear in the background....BTW.....I have a few of the seasonal type Beanie Babies that are very cute to decorate with....the last time I looked on eBay you could buy most of them very cheap.  You might want to check it out.  :)

The little Betsy Ross doll is a vintage Hallmark piece...maybe from the the bicentennial.  A quilt friend gave that to me and I love it.  Also I came across some red chandelier drops, so I added ribbons to them to hang.


The bunny with the heart and the log cabin were both gifts to me from quilt friends and the little crocheted medallion pin was done by my grandma....I added ribbon to hang it.


A patriotic angel is finished in a tart dish....also a Christopher Columbus ornament from Hallmark.  I usually check their patriotic ornaments each Christmas season and most of the time you can purchase those after Christmas on clearance.  :)  The little patriotic kitten is ceramic.


A sweet little patriotic angel that says ......
"Her little flag
She grandly flew
And cheered the
red, white and blue.

Sunday, July 3, 2011

Happy 4th of July

Here is wishing you a Happy 4th of July!!!!


I haven't done much sewing this past week.  My mother had some medical issues and we continue to work on our bathroom makeover.  The "Silver Fox" laughs as he measures again for the umpteenth time......he tells me he doesn't get paid by piece work.....I believe it.    We are progressing slowly, but everything that is done looks great.  So slow and steady seems to be working.  So this week I am going to share some sights outside my front door.  We have had such good rains that everything is just lush here in Eastern Iowa.  I also tucked in a nice piece of clip art to share with you.


 Here is the view outside my front window as I sit in my living room and write to you.


I keep my hand garden tools and my knee pad in the old mailbox.
 We built a "civil war" type fence in the background.  The kind that go zig-zag....which I have never understood the concept around that.  But we have piles of wooden fence posts around here and it was a good way to use a bunch of them up. 

Let's just say these are even more breath-taking in person.  I love the lime green buds against the red flowers.....stunning color combination.   These babies are about the size of my hand.


I have tucked in a special piece of patriotic ephemera for you to save. Right click on it to save it to your computer.  I love to collect pieces of paper history....repros and originals.   This would make a wonderful pillow......print this out on fabric and sew it up.