The biggest advantage to using this hoop for a larger type project where you need to do many hoopings....once you adjust the hoop to accommodate your project....you can just open the latch and close it without any more adjustments.....very quick and very easy.....no tightening or re-tightening after each hooping.
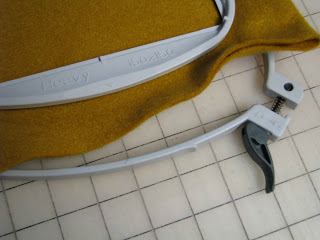
First thing to notice is your hoop came with two inner hoops....one marked LIGHT and one marked HEAVY. It is important to use these in the appropriate applications. If you compare them..... the LIGHT one is slightly larger than the HEAVY one. Which might seem confusing, but the LIGHT one is used with 1-2 layers like your cotton-type fabric with stabilizer, or just one layer of fabric or 1-2 layers of stabilizer. The HEAVY one is used for felt, quilts with batting or any other thick fabric so the hoop is slightly smaller to help accommodate the thickness of the fabric.
The pic above shows two layers of felt that I am going to hoop with the HEAVY inner hoop. Notice the position of the dark gray latch. This is used to close the hoop and make it tight, but before you do that....you need to hoop the felt between the two hoops.
Two layers of felt are thick......I didn't have enough room to even hoop them....so I turned that dark gray latch and loosened it like a screw......"remember lefty loosey and righty tighty." So turn it to the left.....you can see the screw part backing into the latch as you loosen it. Now I usually give it several turns and then TRY and close the latch. As a rule of thumb after you hoop your layers.....your fabric is slightly loose in the hoop before you close the latch. Closing the latch is what tightens it up so you can embroider on it. You don't have it tight in your hoop before closing the latch. Then you will not be able to close the latch or you will break it trying. :(
Absolutely do not force the latch....if it will not go or is warping the closure....STOP.....and loosen the screw some more. This is how the closure gets broken. You need to stop turning the screw so that the lever is at the position in the above picture. Then push the lever toward the hoop as shown below to close the latch and your fabric/stabilizer should be solid in your hoop and ready for embroider. If it is too loose open the latch and tightening the screw some and close latch again. If is is too tight, loosen the screw and try closing the latch again.
This shows the latch closed correctly using the HEAVY inner hoop with felt and the latch is not distorted or stressed.....this is how to keep if from being broken.
This shows the same process except I am using the LIGHT inner hoop instead of the HEAVY. Another thing I failed to mention above is to match that little center mark on the hoop.....it is just left of the zig-zag stitching....to the arrow on the hoop....which does not show in the photo, but it is there. You should always do that with either one of the inner hoops.
I need to adjust the screw and tightening it up a bit when I go from the HEAVY inner hoop to the LIGHT. So give the dark gray lever several turns to the right and then try the latch.....remember DO NOT FORCE IT. You need to stop turning the screw so that the lever is at the position in the above picture. Then push the lever toward the hoop as shown below to lock it in place.
You want your fabric/stabilizer solidly held in the hoop without distorting the closure latch. If your lever does not want to close you have tightened the screw too much and you need to loosen it a bit. Then you will not break the latch and be able to use this hoop over and over again.
Hopefully this is clearer than mud. If you have any questions let me know and hopefully I can answer them. :) I use this hoop more than I use all of my others combined, if I have a choice.
Note: In the LIGHT hoop I have hooped scrap pieces of stabilizer that I have pieced together to use in another project. I wrote about that in the Repurposing post.


No comments:
Post a Comment