Thursday, October 27, 2011

Last Garden Tomatoes and Old Recipes

Hot Spanish Sandwiches 


Well I must say, my tomatoes were not the prettiest this year as you can see and for some reason were kind of slow coming around.....the season seemed to be short. 


I decided to make Spanish Sandwiches, a recipe I haven't made for years and one ALL my girls absolutely hate.  So why am I sharing this with you..... because the Silver Fox and I like them and I can eat them with a few modifications.  I got this recipe from a dear lady already in Glory (who I might add, died and saw the pearly gates of heaven, then came back to earth for a time and told about them)....my dear friend's mother, Juanita.

I have been cooking my bacon in the oven lately....350 for about 20 minutes....turning it part way through cooking.  And on parchment paper too....no washing the pan...even better.


Hot Spanish Sandwiches

10 slices of bread toasted
1/2 lb of bacon cooked
Slices of cheese
Put bacon & cheese between 2 slices of toast.
Pour sauce over the top.

Cook 2 T. onion in some 1 T. of oil
Add 3 cups strained tomatoes
1 green pepper chopped
2 t. of parsley
1/2 c. chopped celery
Simmer 20 min.
Can thicken with a bit of flour in butter.
Pour over your hot toasted sandwiches.
Yum!!!


Chili Sauce


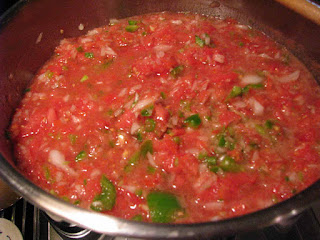
Then still more tomatoes on another day when I checked the garden.  They are coming fast and furious now, knowing their time on this earth is short.  :)  I decided to make some chili sauce....another recipe I haven't done in awhile.  Only this time I am going to freeze it, instead of canning it.


BTW, I thought you might like to see the way I hold recipes or any other paper item that I want to stand up and look perky.  I use old flower frogs ......very cute.  The chili recipe on the left I had my daughter Sally write out for me when she was 10 and include the date and year.  You might want to do that if you have younger kids or grand kids around.  They are such dear things to pull out of your recipe box or book.


I picked all of the peppers I had left in the garden and luckily I had bought a bag on onions at the store.


I chop everything in my Cuisinart......I pretty much use the recipe as a general guideline, just so you know.


Chili Sauce

24 large ripe tomatoes
4 white onions
4 green peppers
4 t salt
1/2 t ground cloves
1/2 t all spice
1 T cinnamon
1 c sugar
1 1/2 pints vinegar

Chop everything and cook slowly for 3 hours then can.  Or if you want to freeze it like I did.  I waited for it to cool down and then bagged it in freezer bags.  I put a quart of sauce into a gal. size bag, then got the air out of the bag and laid them on a cookie sheet so they were nice and flat.  And froze them.  Then you can stand them upright in your freezer like a file folder and see what you have and pull out what you need.

I also made a small batch of the sauce the other day and just added the other ingredients to make the chili for us to eat after I let the sauce cook down a bit. 

Every time I make chili with this recipe for those who have never had it.  They pretty much go nuts over the flavor, because it is sweet and the spices make it unique and interesting. 

Enjoy!!! 

Thursday, October 20, 2011

Play Purse


What a cutie patootie......my dear Cora, who just turned 8 last weekend.  Here she is holding her play purse I made for her.  She has been a purse girl, even since she was old enough to carry something.  She doesn't pack light either.  Everything from toys, stuffed animals, mirrors, combs, money if she has any, books, keys and anything else she can cram into one.  You get the picture.

 I have had these designs for quite awhile and had showed them to Cora at one point and she wanted it yesterday and would ask me if I was working on it.  I had no idea when I started this project that it would literally take me weeks and weeks to complete.  Mind you I was not working on it 12 hours a day.  But there were several days when one hooping would take a whole afternoon.  So this project is not for the "slam it out" mindset.  Notice her initials and flower key ring.....
 This is the back of the purse with cell phone and lip gloss pockets.
 Credit cards and money pockets
 All the beauty products....mirror, file, lotion and hand sanitizer.
 Driver's License with her picture and name, ipod, and sunglasses
Here you can see all the accessories....they are all finished front side and back.  I found a picture of Abe Lincoln to add to the $100 bill.  Let's just say this stuff is stinking cute.....And BTW, Kate Anne was here the other day and saw me working on this.....I could just see where this was going.....Kate says.....I want a play purse too, Mommo......as I am screaming inside.....NOOOOOOO.  Oh sweet, Moses.....her b-day is next August.  I better start NOW.


Here is the link to find this set.

http://www.mollymine.com/product_info.php?cPath=1&products_id=58

Wednesday, October 19, 2011

Harvest

As I took these pictures several days ago there were combines humming in the fields all around me.  I like to ride in the combine....it is a prospective like none other.  You are sitting on top of the grain as it is cut off the stalk and pulled into the machine.  Then magically the trash is thrown out the back and the grain is delivered into a holding tank.   The cabs look like airplane cockpits to me.  So many gauges and levers, then there are the warning buzzers, if the machine perceives something is not right.  It is really an overwhelming machine.  I never drove one.....too chicken...too afraid something would happen and oh, so much $$$ to fix.  The farmers around here are having the "joy" of trying to keep all the metal and debris out of their machines from the storm this summer that destroyed hundreds of grain bins and buildings around here.  I heard that many are having flat tire issues as they run over stuff and ruin their tires.

 My last few weeks have been filled with migraines....and not sleeping....taking meds to get rid of the latest round.  I think I have had 1 day out of the last 14 when I haven't had to take something.  And the MO has
changed.  I normally wake up with a migraine between 3-5 AM and hopefully have it gone by noon.  The last couple weeks, they have been visiting any time between noon and 9 PM.  I new wrinkle in the program, with no changes in my life, so go figure.  Let's just say my production level has suffered.  Enough of that, but it messes up my schedule of my postings and my life.... grrrr

 I just wanted to show the bounty of the land during this harvest season.  My mums are almost like weeds, I have them planted around an old set of wheels in my front yard with some other items.....trying to cover a well casing in my front yard.  Who has a well casing in their front yard?......let's just say NONE of my neighbors do.  There is suppose to be a clematis there too, but the mums I think have taken it over.  Who knew they wouldn't play well with others.
 My daily walk to get the mail and paper every afternoon.  I really like it better when we have corn planted here, partly because I just like the look of the corn better and then I have access to corn stalks to make a shock of that by my front door this time of year.  :)  The corn really does closes us off from the road and the world and I like that too. But the beans were beautiful this year, tall and lots of pods from top to bottom.
 The rusty chicken guarding the hen and chicks in the garden.
Several years ago we built a "civil war" type fence out of our wooden fence post collection.  Now who do you know that has a repository of wooden fence posts?.....oo oo oo, that would be us.  I have a thing for wooden fences.  I take pictures of them, admire them and then want to recreate them here in the perfect spot on Pine Ridge.  This is looking between the posts at the soybean field before it was harvested last week.

Tuesday, October 11, 2011

Little Quilts


This little half square triangle scrap quilt is very sweet.  I did this one several years ago and it is hand quilted.


I recently watched a quilt video where several techniques were shared in using vintage linens to incorporate into your quilt pieces.  One of my favorite tips was using pieces of lace on the back of your quilts to make a casing with which to hang them with.  I loved this idea.....since I have boxes and boxes of vintage lace and linens.  So I went digging and found this collar set....I used one half of it on this piece.  What a nice little surprise...like a piece of jewelry... for the back of the quilt.

This little cutie patootie is from a recent online challenge from Kathleen Tracy.  She has written several books based on historical type doll quilts, while incorporating historical diaries and writings from the appropriate time-period.  Here is her website to check out her books and her blog as well.  I have taken a class from her and am anticipating another fun weekend next February when she comes back to Iowa  for a quilt retreat at our local Grout Museum.


I did machine quilt this little piece.  I love using the special stitch on my sewing machine that looks like a hand stitch...a great affect without the effort.  I also used a leftover piece of binding to finish the edge and included the other collar piece of lace for the casing.  Nice touch, don't you think.  :)
I like to collect label type fabrics of all different varieties when I see them.  This one looks like it has been ink with sepia tone ink.  I used some fine tip permanent fabric markers to hand color it and then wrote my info all around the outside of the design.

Saturday, October 8, 2011

Grace's Baby Quilt

 In recent weeks I finally got this baby quilt finished up for the newest member of our family.  Born to our nephew and his wife on Thursday of last week.  I had the top done for the baby shower in July....but being gone in August pretty much shot any kind of of timely schedule in getting this done.  Luckily I had a few weeks because the baby just arrived and I really wanted to know her name so I could label it accordingly, which I am planning to get to yet this weekend.
This was a fun and easy scrap quilt to put together.  I saw the idea somewhere..., but the gist of it ....you make a log cabin block with a large center square....maybe 3-4" and add  2-2 1/2" logs around it....making a couple laps around.  Then take you blocks and slice them diagonally and mix them up and sew them back together.  So it looks more complicated than what it is.  I did a swirly-type all over pattern in the machine quilting to finish.

Saturday, October 1, 2011

Bathroom Transformation

We started working on our bathroom in June and it is finally finished this week after my dad installed the new cabinet door fronts and hardware.  I forgot to take pictures before we started, but we had mauve colored carpet with tile in front of the stool on the floor and white with rose flowered wallpaper.  This all started because one of the grand kids peeled off part of the wallpaper while they were sitting on the throne...bored I guess.  Not to say it did not need updating because it did.  The timing just wasn't great because of the Silver Fox working full time and going to school full time.....not much time for a remodel job.

But since he was unable to get into his class this past summer it gave us a window of time to work on it and my dad offered to reface the cabinets for us.  So we spent a chunk of our summer looking like we were on one of those renovation reality shows.  I can't say I know how to do much of anything, but I knew how I wanted it to look....  But needed the Silver Fox and Dad to execute the plan.  They did a great job.  As my husband put it....we would not get paid for piece work, because it took us a long time to do everything.  But we persevered and the results are wonderful.
This shows my cabinets in the kitchen which were what they looked like in the bathroom.

Transformed into these maple cabinets.....what a change.....Dad did a great job and they are stunningl.

Here is the light fixture and the top of the mirror.  The mirror was part of my grandparents wedding bedroom set.   I  never had a spot for it until now.

The pictures were in our bedroom, also from my Grandma K., but seemed to fit better here after I repainted the frames.  She always had these hung in her bedroom.

New bath mat and flooring.

A piece of hardanger I stitched a long time ago.....I want to change the pics of my girls from their HS graduation to pics of them on their wedding day.  A project for another day.  The shell night light is from my Grandma T.  They bought it on a road trip to California in the 1940's.  

The counter top and cabinets.

I had no intention of hanging the pic of my Great-Grandma S. in the bathroom, except the frame matches the mirror and light fixture finishes perfectly.  I couldn't have planned that any better.  So I get to enjoy Emma every day in my mirror.